I still remember my first attempt at designing a custom mug for my mom’s birthday. I wanted to put a photo of our family dog wearing sunglasses on it, along with a phrase about being “paw-some.” I spent hours using software trying to figure out layers and vectors. But when the mug arrived, the dog’s face was wrapped awkwardly around the handle the text was too small to read. The colors did not look like they did on my screen. I learned the way that designing for a curved surface like a mug is very different from designing for a flat screen.
Now the best mug design tools for 2026 are not just for people who’re good at graphic design. They are made for people who want to create something special. Whether it is a gift for a friend, products for a small business, or a keepsake for an event.
The truth is, custom mugs have become one of the most popular ways to show off your personality and brand. They are useful, but people actually use them. They get seen many times a day. The hard part has always been the design process itself.
That is where this guide comes in. I will walk you through the mug design tools that are available right now, tell you what makes each one special, and give you a step-by-step approach to creating designs that are ready to print. Even if you have never designed anything before. By the end, you will know exactly which tool fits your needs and how to use it with confidence.
What Makes a Great Mug Design Tool?
Before we look at the tools themselves lets talk about what’s really important. When I was working on that mug project, I did not know what to look for. Here is what I have learned since then.
A good mug design tool should do three things well. First, it should have templates that are specifically made for mugs, which already take into account the shape, size, and area where the design will be printed. Second, it should make it easy to work with text. Most mugs have words or short phrases on them. Third, it should give you a way to export your design so you do not have to guess if your file is ready to print.
Some tools focus on being fast and simple, while others offer options for customization but are harder to learn. Neither way is wrong. It just depends on what you’re trying to do.
The Best Mug Design Tools for 2026: A Detailed Breakdown
1. Adobe Express: The Balanced Choice for Users
I remember showing Adobe Express to my neighbor, who has a small candle business. She wanted to create mugs for her holiday market booth. She had no experience with design. Within twenty minutes, she had three designs to print. That is the power of this tool.
Adobe Express is a design platform that you can use in your web browser, which makes it less scary to start designing. The process of making a mug starts with templates that are already the right size for typical mugs. You are not looking at a page, wondering where to start.
What makes it shine:
The interface is very easy to use. You can. Drop things, swap out text, add your photo or logo, and change colors. That is it. The controls for changing the look of your text are straightforward. You can resize it, change the font, and adjust the spacing without having to dig through menus.
Another great feature is the tool that removes the background from your photos. If you have ever tried to cut out a photo background by hand, you know how annoying it can be. Adobe Express does this with one click, which is a lifesaver when you are working with photos of people or products.
For users in the US, UK, Australia, and Canada, the platform also lets you design and order printed mugs in one process.
Where it falls short
If you are looking for realistic previews that show every reflection and shadow, you will not find that here. The previews are functional, not fancy. Also, some of the premium assets need a paid subscription, though the free version covers basic needs.
Who should use it
Adobe Express is ideal for anyone making one-off gifts, batches of products, or event favors. It is also perfect for business owners who need to make consistent branded mugs without hiring a designer. The learning curve is gentle. The results look professional.
2. Canva: The Template Powerhouse
If you have ever seen someone create a birthday invitation in under two minutes, they were probably using Canva. This tool has become known for making design accessible for a reason.
Canva has a library of mug templates that cover almost every theme you can think of. Wedding favors, retirement gifts, motivational quotes, and team logos. It is there. The editor is so easy to use that you barely need instructions.
What makes it shine
The huge number of options is Canvas point. You can look through dozens of styles in minutes, which is incredibly helpful when you are not sure what direction to take. The platform also makes it easy to create versions of a design. If you are making mugs for a team event with names or roles, Canva handles this beautifully.
Collaboration is another strength. You can share a design link with teammates, get comments, and make revisions without sending files forth.
Where it falls short
Because the templates are widely used, some designs can feel generic if you do not customize them enough. The tool also gives you many choices that it easy to get stuck in decision paralysis. If you are the type of person who opens Netflix and spends forty minutes choosing what to watch, Canva might feel overwhelming at first.
Who should use it
Canva is perfect for team event planners and anyone who values speed over customization. If you need to produce a dozen mug designs and your main goal is visual consistency, this tool delivers.
3. Printify: The Seller’s Best Friend
My cousin started a small online shop selling mugs with funny quotes about parenting. She tried using a design tool first, but the transition from design to production was clunky. When she switched to Printify, everything changed.
Printify is a print-on-demand platform, which means the design tool is directly connected to the production and fulfillment process. You are not just creating artwork. You are setting up a product that can be sold and shipped automatically. The platform connects you to a print network. A collection of printers that fulfill orders on your behalf.
What makes it shine
The product-first workflow eliminates guesswork. When you select a mug style, the design tool automatically respects the print area, size constraints, and placement requirements for that product. You will not accidentally place text where the handle will block it or design outside the printable zone.
For sellers, the integration with stores like Shopify, Etsy, and WooCommerce is a game-changer. You design once. The product appears in your store with mockups, pricing, and fulfillment settings ready to go. Printify handles order fulfillment so you can focus on creating and marketing your products.
Where it falls short
Printify’s design tools are limited compared to editors like Adobe Express or Canva. It is designed for production accuracy, not exploration. If you want to create illustrations or experiment with typography, you will likely design elsewhere and import the artwork.
Who should use it
Printify is best for business owners, merch sellers, and anyone building a product line. If your goal is to sell mugs, then just create a single gift; this tool saves enormous time and prevents costly production errors.
4. VistaPrint: The Straight-to-Order Solution
Sometimes you do not need a design library, collaboration tools, or fulfillment integrations. Sometimes you just need a mug with a photo and a name, and you need it delivered by next week.
VistaPrint is a print retailer that prioritizes ordering over design exploration. The customization process guides you through product selection, artwork placement, and checkout without making you feel like you are in a professional design tool.
What makes it shine
VistaPrint is very straightforward. You pick a mug, upload your photo, add some text if you want, and you are done. The website is easy to use. The process is quick. You do not have to worry about designing something from scratch or figuring out software.
The shipping is also fast. VistaPrint can get your mug to you quickly which is great if you are in a hurry.
Where it falls short
The design options are limited. You cannot do a lot of customization. Make intricate designs. If you want something specific or unique, VistaPrint might not be the best choice.
Who should use it
VistaPrint is perfect for people who need a mug quickly. If you want to make a one-off gift or a small order, and you do not have a lot of time, this is an option.
The product-centered approach is really simple. You pick the mug style you like, upload your image or text, and the preview shows you how it will look. You do not have to worry about file formats, resolution, or safe margins. The tool handles those details behind the scenes.
For photo mugs VistaPrints interface is particularly strong. You can crop, position, and preview with confidence that what you see is what you will get.
Where it falls short is layout flexibility. It is limited compared to design tools. You are working within the constraints of VistaPrint’s product templates, which means room for creative experimentation. This is fine for designs but restrictive for complex ones. As one customer noted, the on-screen preview does not always reflect how small details will appear on the product.
VistaPrint is ideal for gift-givers, event organizers, and anyone who wants an ordering experience. If you are making one mug for a housewarming gift or a small batch for a family reunion, this tool gets the job done with ease.
Step-by-Step Guide: Creating Your First Mug Design
Let me walk you through the process I now use whenever I create a mug. This framework works regardless of which tool you choose.
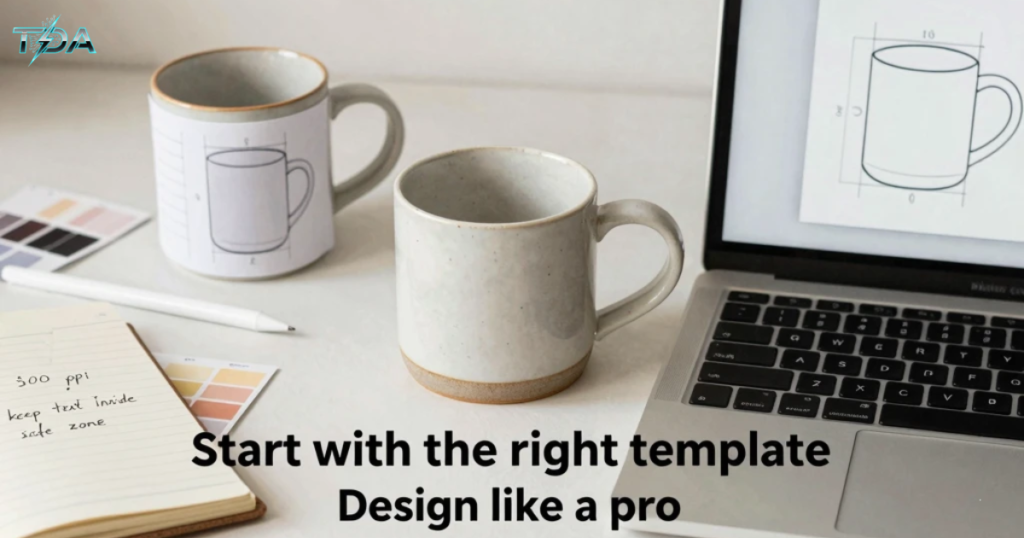
Step 1: Choose Your Mug Style First
This sounds obvious. It is the most common mistake I see. The mug style determines everything. The print area size, whether the artwork wraps around, how colors will appear, and what file dimensions you need.
If you are making an 11-ounce mug, your printable area is roughly 8.5 inches wide by 3.6 inches high. A large travel mug might have a taller print zone. A magic color-changing mug uses a heat- coating that can mute fine details, so bold, simple designs work best.
Pro tip: Download the template from your printer before you start designing. Most platforms provide them. Design inside that template to avoid last-minute surprises.
Step 2: Gather Your Assets
Collect everything you will need before opening your design tool. This means logo files, photos, text copy and color codes. I once tried to find a client’s logo while designing. After thirty minutes of searching, I had lost my creative momentum. Having everything upfront makes the process smooth and enjoyable.
Step 3: Understand Bleed and Safe Zones
This is where the technical details matter. Every printed mug requires safe zones to ensure your design prints correctly.
Bleed is the area that extends beyond the cut size. Typically, 0.125 inches on all sides. This ensures that the color goes all the way to the edge after trimming.
Safe zones are the areas where critical content should stay. 0.125 Inches inside the final cut size on all sides. Keep your text, logos, and important design elements within this zone to prevent them from being cut off.
The handle seam is especially tricky. In full-wrap prints, the seam falls near the handle. Avoid placing faces, intricate patterns, or important text right at that seam. Even a tiny shift during printing can make the alignment look off.
Pro tip: Print your design on paper at actual size, wrap it around a mug, and tape it near the handle. This paper test catches spacing issues that a flat screen can’t reveal. I use this trick every time now. It’s saved me from countless disappointing results.
Step 4: Handle Text and Typography
Readable text is the difference between a mug that gets used and one that gets hidden in the back of a cabinet.
Stick to one or two fonts maximum. A clean sans-serif font like Inter or Helvetica works well for designs. If you use a script font, increase the size. Add extra spacing between letters. Curved surfaces compress text more than you expect.
Keep text no smaller than approximately 10 to 12 point at print size.
Step 5: Resolution and Color Preparation
Resolution matters more than you think. Printers need 300 pixels per inch at the print size for high-quality results. If your printable area is 8.5 inches by 3.5 inches, your file should be 2550 by 1050 pixels.
Color space is equally important. While many online tools accept RGB files, printers typically convert to CMYK. Saturated neon tones can dull when converted, so check your colors carefully.
Bigger files are fine. Smaller files that get enlarged will look soft and blurry on the mug. If your photo is low resolution, either redesign to use a smaller image panel or choose a different photo.
Step 6: Preview, Proofread, and Order
Before you click that order button, do three things:
1. Preview from all angles. Most tools offer a preview. Spin the mug, check alignment near the handle, and confirm that nothing important falls in a seam.
2. Proofread everything. Read your text backward if you have to. Typos on printed mugs are heartbreaking because there’s no fix.
3. Check your margins one time. Is any text close to the top? Is it a face bending around the handle curve? Fix these now.
If you are ordering a batch for an event, consider ordering one sample mug first. Seeing the product in your hands before committing to 100 units is worth the extra time and cost.
Design Tips for Professional-Looking Results
Let me share a few lessons I’ve gathered from trial and error. Error.
Curved Surfaces Distort Everything
Horizontal designs read more naturally around a curve than vertical blocks. If you are placing text let it flow across the mug than stacking it tall.
Contrast is your friend. Light text on a mug? Make sure the contrast is strong enough to read across the room. Dark text on a mug? The same rule applies. When in doubt, test your design by stepping a few feet and squinting. If it’s still readable, you are safe.
Color Interaction
What you see on screen is not what you will get on ceramic. Glossy finishes make colors pop and create crisp graphics. Matte finishes have a more artistic feel but can slightly mute colors.
If you are using a colored mug, light or white ink works best for visibility. Alternatively, add a panel behind your design so the text or logo remains readable.
For heat- magic mugs, the coating can slightly mask fine details, so go for bolder shapes and thicker strokes.
Frequently Asked Questions
What features should beginners prioritize in a mug design tool?
Ease of use, clear templates, and proper sizing guides. Look for tools that offer mug templates and show you exactly where the safe margins are. You do not need features for most mug projects. Simplicity prevents mistakes. Adobe Express and Canva are starting points.
Can I use a design tool like Canva or Adobe Express for print-on-demand selling?
Yes, but with a workflow adjustment. Design in Canva or Adobe Express, first export a high-resolution PNG, then upload that file to your print-on-demand platform like Printify. This gives you the best of both worlds: flexibility plus production accuracy.
What resolution should my mug design file be?
300 pixels per inch at the print size is the industry standard for high-quality printing. If your printable area is 8.5 inches by 3.5 inches, your file should be 2550 by 1050 pixels. Always check your printer’s requirements as they may vary by product.
What are bleed and zones, and why do they matter?
Bleed is the area that extends beyond the cut size. Typically, 0.125 inches on all sides. Ensuring color goes to the edge. Safe zones are the area inside the cut where critical content should stay. Also, typically 0.125 inches inside all edges. These prevent your text or logos from being cut off during production.
How do I avoid text or images wrapping around the handle?
Keep critical content away from the handle seam. Most full-wrap prints have a seam near the handle. Use the tools’ preview function to check placement and perform a paper test by printing your design and wrapping it around a mug to see the real-world alignment before ordering.
Conclusion
Looking back at that mug I made for my mom. The one with the dog’s face wrapped awkwardly around the handle. I realize now that the tools were not the problem. I just did not know how to choose the one for my needs.
The best mug design tools for 2026 have made it easier than ever to create something professional and print-ready. Adobe Express offers an approach that works for most people with integrated print ordering in select regions. Canva delivers speed and variety when you need options. Printify streamlines the path from design to sales with its print network. Vistaprint handles simple orders with no fuss.
The key is matching the mug design tools to your goal. Are you making a gift? Keep it simple with a print retailer. Are you building a product line? Lean into print-on-demand platforms like Printify. Are you exploring ideas? Start with a template editor like Canva that gives you room to experiment with the mug design tools.
Whatever path you choose, remember the fundamentals: start with the mug style, respect the curve and handle seam of the mug, use high-resolution images of the mug design, include bleed, keep text readable on the mug, and preview the mug design carefully. These principles have saved me from design disasters with my mug designs, and they will serve you just as well with your mug design tools.
Your perfect mug is waiting to be created with the mug design tools. Now you have the mug design tools and the confidence to make it happen with the mug design tools for 2026.
Read More Topics on Techdoaction

Haseeb Ur Rehman Lali is the lead technical author at TechDoAction, known for decoding the latest advancements in Artificial Intelligence and Software and Security Solutions for a global audience. His research-driven articles on AI frameworks and software solutions remain some of the site’s most trusted resources. He also leads Tech Gift Guides, applying the same research-first approach to help readers find gear worth packing or gifting. His mission stays the same: turn complex choices into clear, practical knowledge readers can use immediately.